Backing up Proxmox
I’ve now been running Proxmox on my Gen8 Microserver for some time and initially my backup strategy was to use the built in Proxmox backup system to back my VM’s up to a second internal hard drive. I would then plug a USB disk into the server and rsync my backups over.
Over time this became rather tedious and was far from an ideal solution.
However, with a NAS in place and plenty of free space I decided it would be best if I could back up my VM’s there.
Like several of my recent posts, this will start out in FreeNAS. I created a new Dataset in FreeNAS for my Proxmox backups and gave it a quota. To work out the quota size I looked at the sizes of some of my recent backups and decided to allocate enough space for 10 backups of each VM plus approximately 20%. I can always increase this size in the future if required.
With the dataset created I had to give Proxmox some sort of access to it. I looked at the various options available and decided that NFS would be the best way to go for me.
I created a new NFS share in FreeNAS and after some trial and error found that the below permissions worked for me:
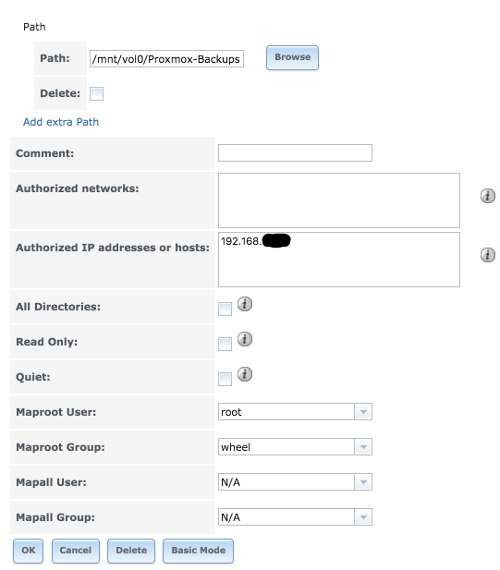
(Of course substitute the Authorised IP address with the address of your Proxmox host)
With the storage and sharing taken care of on the NAS side and the NFS service being enabled in FreeNAS, on to Proxmox!
Storage has to be added at the datacenter level so with the datacenter tree selected I opened the storage tab and clicked on “Add” then “NFS”.
These are the options I used which allow for up to 10 backups of each VM to be stored, the oldest being deleted when this is exceeded.
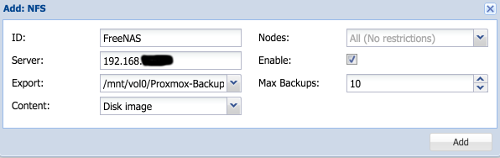
(Substitute the IP address with the address of your NAS and select your Export/Share from the drop-down list)
With the storage added I moved on to the backup tab.
I decided to back up my VM’s 3 times a week, starting at mid day. I chose to back up selected VM’s only as I didn’t really want to be unnecessarily backing up test VM’s. I also chose to use Gzip compression. While this means that backups do take longer and are more CPU intensive to execute it also keeps the file sizes very small.
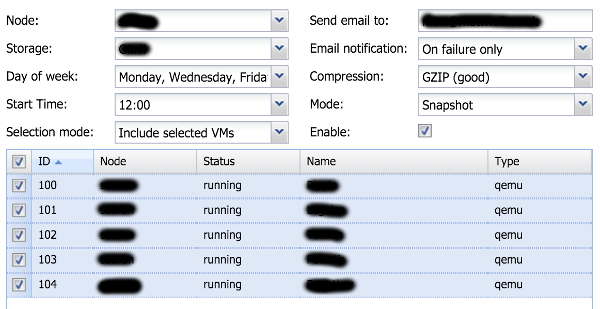
Initially I had set Proxmox to email me every time a backup completed but I quickly realised that I didn’t really read the emails and would probably miss a failure notification so I chose to email on failure only.
When configuring backups you should of course try a test restore and continue to do this periodically to ensure that your backups are recoverable.
This is very simple to do in Proxmox. Simply navigate to your storage in the Server view tree, select the Content tab and click “Restore”. You can then select where you want to restore the VM disk to and the new ID for the VM. I tend to do a test restore approximately once a month.
I have yet to have a backup fail and this solution has worked very well for me. I have yet to have the need to restore from backup, but should the need arise I am confident that it will go smoothly.