FreeNAS Storage Upgrade
This post is being written retrospectively and the solution described has recently been replaced. However, I found it very useful and I’m writing this in the hope that it may be of use to others.
At the time I was starting to run low on storage space on my array and was looking to expand. This presented a bit of an issue as the Gen8 Microserver only has 4 3.5” bays.
One option was to buy 4 larger disks and replace them one by one, increasing the size of the array once all 4 had been replaced. Another option was to replace the Gen8 Microserver with something larger.
I didn’t particularly like either of these options as the first was quite risky and would result in spare disks that I didn’t have the capacity to use. The second option would be quite expensive as I would need a completely new system.
The option I ultimately went with was neither of the above but rather to add an external enclosure to house more disks. After some maths this proved to be more cost effective in the short term and would provide the additional capacity required until I was ready to build an all new system.
Component Selection
I decided I would need to house at least 4 drives and so began searching for a suitable case.
There were several options and while hot swap would have been nice it was not a requirement.
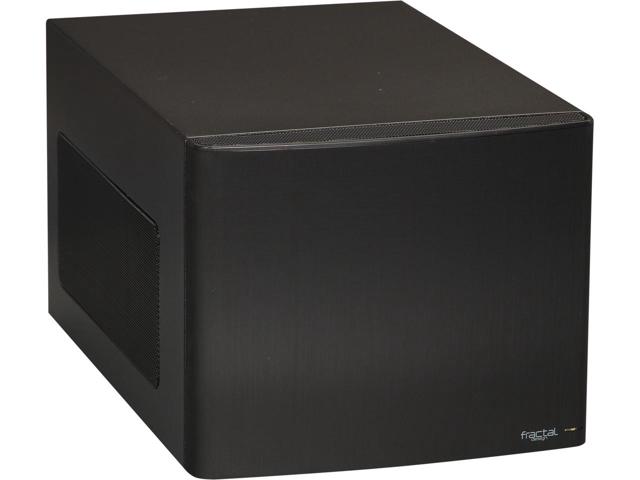
I ultimately chose the Fractal Design Node 304 and was able to find one second hand on ebay at a very reasonable price. This can house up to 6 drives and was an ideal form factor. Another good option was the Silverstone DS380, however these were significantly more expansive.
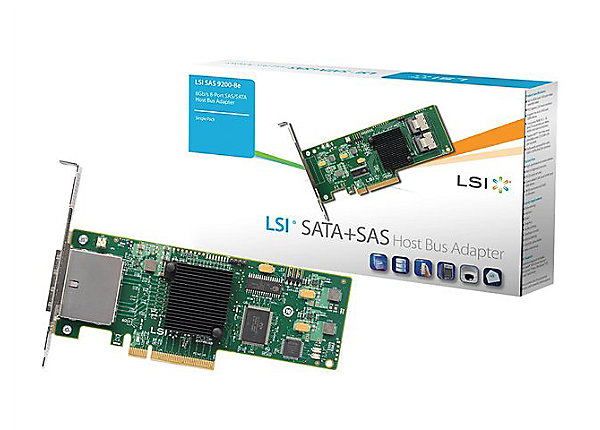
The next requirement was a Host Bus Adaptor (HBA) to connect the microserver to my DIY enclosure. After some research I decided to go with an LSI SAS2008 based controller and was able to find an LSI 9200-8e at a reasonable price. Another good option would have been the Dell 6gbps HBA.
These are both PCIe SAS HBA’s with 2 6gpbs external SAS 8088 ports, each of which can expand to 4 SATA connections providing a total of 8.
For power I simply utilised a spare bronze rated FSP 450W ATX PSU I had on hand.
I had a couple of choices for controlling the power supply. As this enclosue was not going to have a motherboard one option was to simply bridge the green pin on the PSU with a ground (black) pin. There are pre-made adaptors for this readily available online.
However, while reading about other DIY expansion enclosures I found the Supermicro CSE-PTJBOD-CB2 JBOD Power Board.
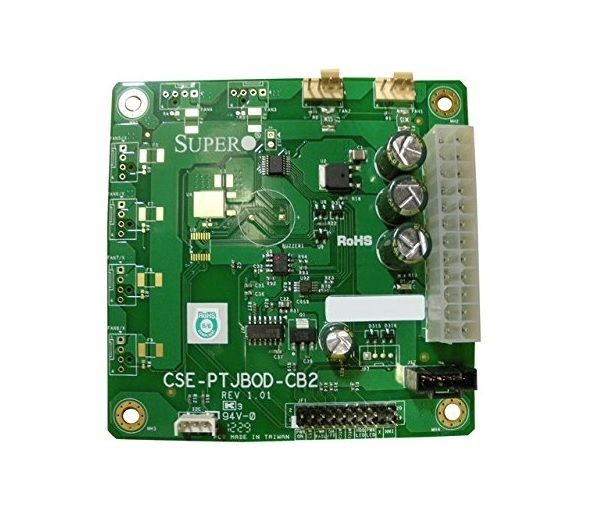
This board can power two fans and allows the power button on the case to be pressed to turn the PSU on and held for 10 seconds to power it off. I was able to locate one relatively cheaply, however now these are becoming more rare alternatives are cropping up such as the Gooxi JBOD Button board.
There is also the more recently released Supermicro CSE-PTJBOD-CB3 which includes an RJ45 connected BMC for remote power-on.
The last component for the enclosure was the cabling. This was easily achieved with a single 0.25m SAS 8088-8088 cable, an internal to external SAS 8087-8088 PCI bracket and a Mini-SAS SFF-8087-4x-SATA forward break-out cable.
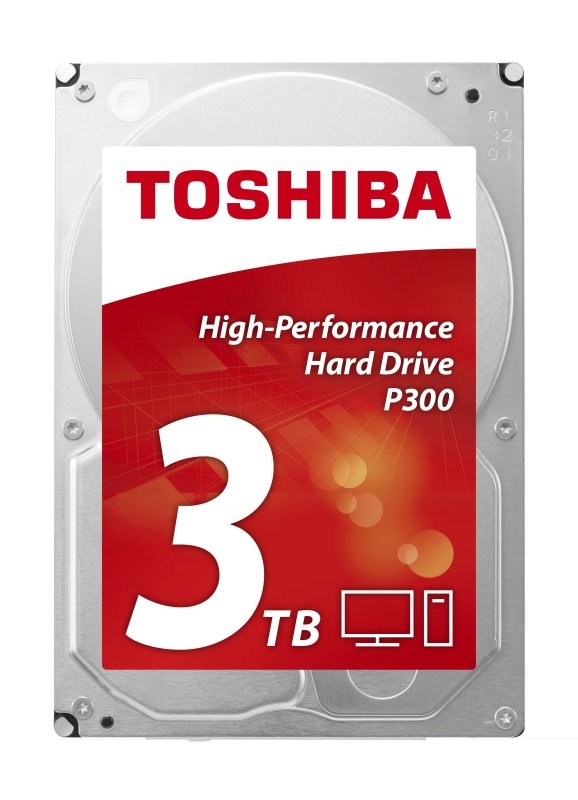
For the disks, although I would have liked to go with more Western Digital 3TB RED drives I couldn’t resist the price of the Toshiba P300 3TB drives. I was able to buy these for £73 each and have not regretted this decision.
Assembly and testing
The assembly of the enclosure was very straight forward. As the Supermicro power control board had 4 holes to allow it to be attached to a case I simply used one of these to attach it to a motherboard standoff. This proved to be strong enough to hold it in place.
After installing the HBA I was given a warning in FreeNAS that the firmware version was out of date. This was very easy to resolve as the sas2flsh tool is included in FreeNAS and instructions are readily available on the Internet. I will likely write a post on this process in the future.
After installing the disks in the enclosure I connected this to the HBA in my Microserver with the 8088-8088 SAS cable. I was then able to see the disks in FreeNAS as /dev/da0-3.
After running long S.M.A.R.T tests on each disk I added the 4 new disks as another RAIDz1 to my pool as follows:
I first use the -n option to perform a dry run: zpool add -n vol0 raidz /dev/da0 /dev/da1 /dev/da2 /dev/da3. (In my case I used the ID’s of the disks found under /dev/disk/by-id/)
After confirming that the output was acceptable I ran this without the -n flag.
Running zpool status then showed the following:
[root@nas-01] ~# zpool status
  pool: freenas-boot
 state: ONLINE
  scan: scrub repaired 0 in 0h0m with 0 errors on Sat May  6 16:17:23 2017
config:

        NAME        STATE     READ WRITE CKSUM
        freenas-boot  ONLINE       0     0     0
          mirror-0  ONLINE       0     0     0
            da9p2   ONLINE       0     0     0
            da8p2   ONLINE       0     0     0

errors: No known data errors

  pool: vol0
 state: ONLINE
  scan: scrub repaired 0 in 11h56m with 0 errors on Thu May 11 19:56:29 2017
config:

        NAME                                            STATE     READ WRITE CKSUM
        vol0                                            ONLINE       0     0     0
          raidz1-0                                      ONLINE       0     0     0
            gptid/dff6e82d-4f68-11e5-9220-a0b3ccdf05de  ONLINE       0     0     0
            gptid/e06f42ea-4f68-11e5-9220-a0b3ccdf05de  ONLINE       0     0     0
            gptid/e0f4248d-4f68-11e5-9220-a0b3ccdf05de  ONLINE       0     0     0
            gptid/e1787b7c-4f68-11e5-9220-a0b3ccdf05de  ONLINE       0     0     0
          raidz1-1                                      ONLINE       0     0     0
            gptid/42e97a2e-9c0b-11e6-8c18-b05ada874e14  ONLINE       0     0     0
            gptid/45540798-9c0b-11e6-8c18-b05ada874e14  ONLINE       0     0     0
            gptid/47ef8f4c-9c0b-11e6-8c18-b05ada874e14  ONLINE       0     0     0
            gptid/4a5c9e45-9c0b-11e6-8c18-b05ada874e14  ONLINE       0     0     0
I eventually used this solution for over 9 months until I ultimately decided to upgrade. However I would still consider this a temporary measure and this is not something I would recommend be used outside of a homelab scenario.
Caveats
I found several caveats or gotcha’s to this solution as follows:
The SATA specification only allows for cables of up to 1m and so short 8088-8088 and break-out cables must be used. Failing to do this may result in signal degradation between the controller and the drive resulting in an intermittent connection and the possibility of dataloss!
Additionally the expansion enclosure must be powered on before the server it is attached to.
When adding additional vdev’s to a ZFS array the pool will not automatically re-balance and so if this is required the only way at present to do this is to copy the data off the pool and back again.
I would also recommend that all drives in the same pool be the same speed. In my case using 7200 RPM drives was due to pricing rather than best practice.
Also due to my use of 7200 RPM drives I found that heat started to become an issue. I overcame this by turning the fan controller on the Node 304 to max which resolved the issue. However, this is something to be aware of.