Upgrading my Network
For some time I simply used unmanaged gigabit switches to extend my network.
This worked without a problem for a long time. However, more recently I was looking into the possibility of adding VLANs to my network, something unmanaged switches do not support. Additionally, each of my HP Microservers have two gigabit NICs and both FreeNAS and Proxmox support link aggregation, something I wanted to implement. Again, this is not possible with unmanaged switches.
I spent some time looking at the options available. The Cisco SG300 was a very strong contender but at the time it was a little more expensive than I would have liked.
After spending some time searching Ebay for various options I stumbled on the HP v1910-24G (JE006A).
While the v1910-24G is technically a Layer 2+ “smart” switch and not a true Layer 3 “managed” device, it supports vlans and static routes which is all I actually required.
Making it quiet
I was very happy with my new purchase, that is until I powered it up. Being a 1U rackmount device, the v1910-24G is equipped with a single 40mm fan which is extremely loud to say the least. In fact at approximately 38dB, the noise it created easily drowned out everything else in my lab combined.
Thanks to Chris Wahl and his blog post of the subject I decided to replace the stock fan with a Noctua NF-A4X10-FLX 5V.
(NB: The 5v part is crucial as the power provided to the fan by the switch is not enough to power a 12v fan.)
It was a very simple process to open the switch and replace the fan using the scotchlok kindly included by Noctua.
To avoid the “FAN_FAILED” and “FAN_RECOVERED” messages in the logs I connected the red and black power leads to the fan and connected the white PWM cable to the switch’s ground screw.
While certainly not silent this did massively improve the noise output of the switch.
Accessing the WebGUI
The switch came with a sticker detailing the default IP address of the device and I was simply able to log in with the username “admin” and no password.
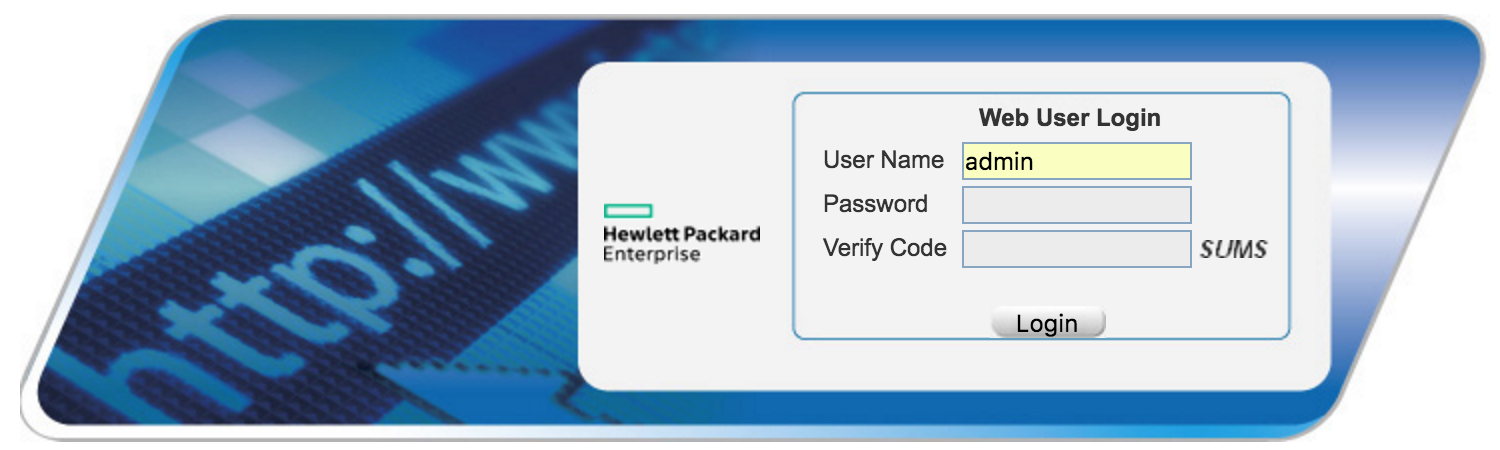
HP are still producing firmware for the v1910-24G so the first thing I did was to download the latest firmware and install it via the web interface. I then configured the management interface IP address and went through the initial setup wizard to configure the switch. All fairly straight forward.
I will go through further configuration of the switch in future posts.
While the Web GUI of the v1910-24G is not fantastic, it’s certainly functional and allows for everything I require from a switch. I did however want to access the switch from the command line like the Cisco devices that I am more used to working with.
Accessing the Command Line
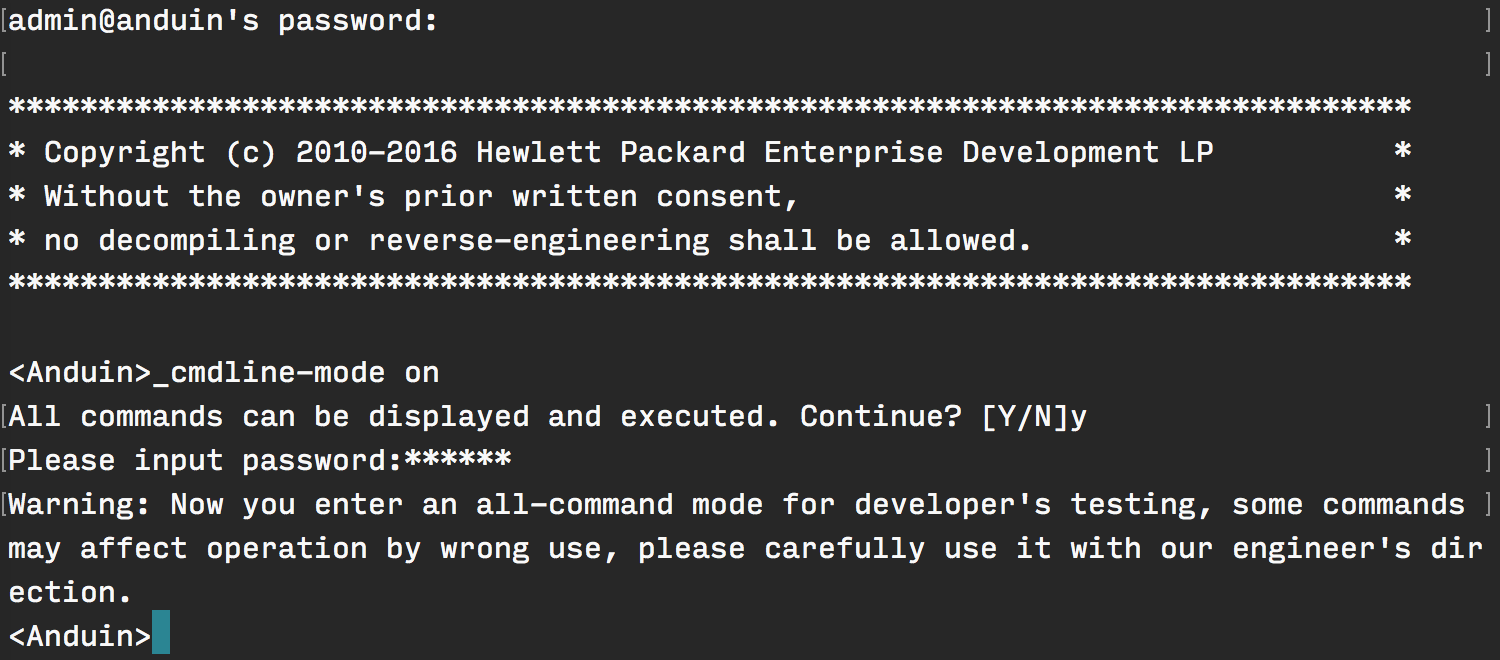
I was pleased to find that I was able to enable ssh on the switch. However, after ssh’ing into the switch I was rather disappointed to find that I was rather limited to a very small selection of commands which didn’t really allow for any configuration.
Thanks to Fred’s blog post at https://glazenbakje.wordpress.com I was able to enable the full commandline mode by using the command _cmdline-mode on.
The password on all v1910’s is 512900.
When opening an ssh session to the v1910-24G I typically copy and paste the following:
_cmdline-mode on
Y
512900
This looks like the following:
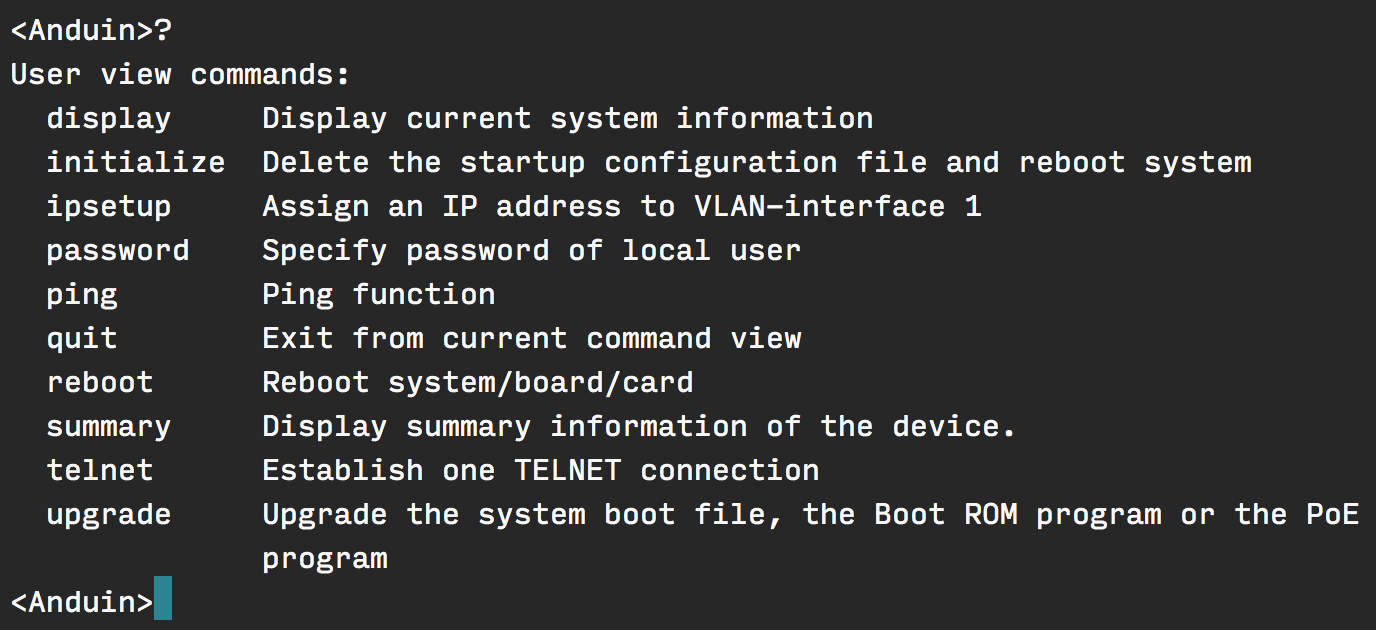
The commands available in this mode are as follows:
<Anduin>?
User view commands:
  archive        Specify archive settings
  backup         Backup next startup-configuration file to TFTP server
  boot-loader    Set boot loader
  bootrom        Update/read/backup/restore bootrom
  cd             Change current directory
  clock          Specify the system clock
  cluster        Run cluster command
  copy           Copy from one file to another
  crypto-digest  Compute the hash digest for a specified file
  debugging      Enable system debugging functions
  delete         Delete a file
  dir            List files on a file system
  display        Display current system information
  fixdisk        Recover lost chains in storage device
  format         Format the device
  free           Clear user terminal interface
  ftp            Open FTP connection
  initialize     Delete the startup configuration file and reboot system
  ipc            Interprocess communication
  ipsetup        Assign an IP address to VLAN-interface 1
  lock           Lock current user terminal interface
  logfile        Specify log file configuration
  mkdir          Create a new directory
  more           Display the contents of a file
  move           Move the file
  ntdp           Run NTDP commands
  password       Specify password of local user
  ping           Ping function
  pwd            Display current working directory
  quit           Exit from current command view
  reboot         Reboot system/board/card
  rename         Rename a file or directory
  reset          Reset operation
  restore        Restore next startup-configuration file from TFTP server
  rmdir          Remove an existing directory
  save           Save current configuration
  schedule       Schedule system task
  scp            Secure copy
  screen-length  Specify the lines displayed on one screen
  send           Send information to other user terminal interface
  sftp           Establish one SFTP connection
  ssh2           Establish a secure shell client connection
  stack          Switch stack system
  startup        Specify system startup parameters
  summary        Display summary information of the device.
  super          Set the current user priority level
  system-view    Enter the System View
  telnet         Establish one TELNET connection
  terminal       Set the terminal line characteristics
  tftp           Open TFTP connection
  tracert        Trace route function
  undelete       Recover a deleted file
  undo           Cancel current setting
  upgrade        Upgrade the system boot file, the Boot ROM program or the PoE
                 program
Additionally the system-view command allows for further configuration and unlocks the following commands:
<Anduin>system-view
System View: return to User View with Ctrl+Z.
[Anduin]?
System view commands:
  aaa                      Specify AAA configuration
  acl                      Specify acl configuration information
  archive                  Specify archive settings
  arp                      Specify ARP configuration information
  bootrom-update           bootrom update
  burst-mode               Specify burst mode
  cfd                      Connectivity fault detection (IEEE 802.1ag)
  clock                    Specify the system clock
  cluster                  Specify cluster configuration information
  command-alias            Specify command alias
  command-privilege        Specify the command level
  configuration            Specify configuration settings
  copyright-info           Copyright information configuration
  cut                      Cut connection
  delete                   Delete function
  dhcp                     DHCP configuration subcommands
  dhcp-snooping            DHCP Snooping
  display                  Display current system information
  dldp                     Specify configuration information of DLDP
  dns                      Specify domain name system
  domain                   Add domain or modify domain attributes
  dot1x                    Specify 802.1X configuration information
  execute                  Batch Command
  file                     Specify file system configuration information
  fips                     Federal Information Processing Standards (FIPS)
                           140-2 module
  ftp                      Specify FTP configuration information
  garp                     Generic Attribute Registration Protocol
  gratuitous-arp-learning  Gratuitous Arp learning function
  gratuitous-arp-sending   Sending gratuitous-arp packet when receiving
                           different sub-network arp packet function
  gvrp                     GARP VLAN Registration Protocol
  habp                     Specify HABP configuration information
  header                   Specify the login banner
  hotkey                   Specify hotkey configuration information
  hwtacacs                 Specify HWTACACS server
  igmp-snooping            IGMP snooping
  ike                      Specify IKE(Internet Key Exchange) configuration
                           information
  info-center              Specify information center configuration information
  interface                Specify the interface configuration view
  ip                       Specify IP configurations for the system
  ipsec                    Specify IPSec(IP Security) configuration information
  ipv6                     Enable IPv6 functionality
  job                      Schedule a system task
  jumboframe               Jumboframe command
  lacp                     Configure LACP Protocol
  link-aggregation         Specify link aggregation group configuration
                           information
  lldp                     Link Layer Discovery Protocol(802.1ab)
  local-user               Specify local user configuration information
  logfile                  Specify log file configuration
  loopback-detection       Detect if loopback exists
  mac-address              Configure MAC address
  mac-authentication       Specify Mac-auth configuration information
  mac-vlan                 Specify the MAC VLAN configuration information
  mirroring-group          Specify mirroring-group
  mld-snooping             Enter mld-snooping view
  monitor-link             Configure monitor link
  multicast-vlan           Multicast VLAN
  ndp                      Neighbor discovery protocol
  nqa                      Specify NQA (Network Quality Analyzer) configuration
                           information
  ntdp                     Specify NTDP configuration information
  ntp-service              Specify NTP(Network Time Protocol) configuration
                           information
  oam                      OAM protocol
  password-control         Specify password control
  password-recovery        Password recovery function
  patch                    Specify patch configuration information
  ping                     Ping function
  pki                      Specify PKI module configuration information
  port-group               Port group
  port-security            Specify port-security configuration information
  portal                   Portal protocol
  public-key               Specify public-key module configuration information
  qos                      Command of QoS(Quality of Service)
  quit                     Exit from current command view
  radius                   Specify RADIUS configuration information
  return                   Exit to User View
  rmon                     Specify RMON
  save                     Save current configuration
  sftp                     Specify SFTP service attribute
  shutdown-interval        ShutDown Detection
  slave                    HA command
  smart-link               Configure smart link
  snmp-agent               Specify SNMP(Simple Network Management Protocol)
                           configuration information
  ssh                      Specify SSH (secure shell) configuration information
  ssl                      Specify SSL (Secure Socket Layer) configuration
                           information
  stack                    Switch stack system
  storm-constrain          Port storm-constrain
  stp                      Spanning tree protocol
  super                    Specify super configuration information
  sysname                  Specify the host name
  system-failure           System failure handling method
  system-guard             System guard function
  tcp                      Specify TCP(Transmission Control Protocol)
                           configuration information
  telnet                   Specify TELNET configuration information
  temperature-limit        Set temperature limit
  tftp                     Specify TFTP configuration information
  tftp-server              TFTP Server
  time-range               Specify time-range configuration information
  tracert                  Trace route function
  traffic                  Specify traffic configuration information
  transceiver              Transceiver information
  undo                     Cancel current setting
  user-group               Specify user group configuration information
  user-interface           Configure the user terminal interface
  user-profile             User profile
  vlan                     Configure VLAN
  voice                    Specify voice VLAN
  web                      Web configuration
To summarise I was and am very happy with my new switch and would highly recommend the v1910-24G for a homelab scenario.