New Proxmox Cluster - Part 2
Installing Proxmox
With my two new servers prepared I set about installing the latest version of Proxmox 5.4. I did the installation via the iDrac console over the network and it was very nice to be able to install the OS from my desk without needing to bother with pulling out a screen, keyboard and mouse.
The installation of Proxmox is very straight forward and although it did not allow me to configure my desired network configuration during the installation it does allow for various storage options.
I chose to install Proxmox with a ZFS pool of Mirrors (labelled as ZFS RAID 10) which creates two partitions on the first Mirror, the second for ZFS and the first for the boot partition.
The Proxmox wiki is very comprehensive and I do recommend reading it before starting as there are a number of things to consider when deploying a hypervisor.
Configuring the network
One of the first things I needed to do on each freshly installed host was to configure LACP.
Personally I prefer to use OpenVSwitch for this and installed it as follows: apt -y install openvswitch-switch
My OVS configuration is similar to the following:
1
2
3
4
5
6
7
8
9
10
11
12
13
14
15
16
17
18
19
20
21
22
23
24
25
26
27
allow-vmbr0 bond0
iface bond0 inet manual
        ovs_bonds eno1 eno2
        ovs_type OVSBond
        ovs_bridge vmbr0
        ovs_options bond_mode=balance-tcp lacp=active

auto lo
iface lo inet loopback

iface eno1 inet manual

iface eno2 inet manual

allow-vmbr0 intport0
iface intport0 inet static
        address  10.0.30.1
        netmask  255.255.255.0
        gateway  10.0.30.254
        ovs_type OVSIntPort
        ovs_bridge vmbr0
        ovs_options tag=30

auto vmbr0
iface vmbr0 inet manual
        ovs_type OVSBridge
        ovs_ports bond0 intport0
On my HP v1910-48G I have the following configured (as an example for a single node):
1
2
3
4
5
6
7
8
9
10
11
12
13
14
15
16
17
18
19
20
21
22
23
24
interface Bridge-Aggregation7
 description LACP Link to Proxmox (PVE01-01) 10.0.30.1
 port link-type trunk
 port trunk permit vlan 1 30 to 40
 link-aggregation mode dynamic
#
interface GigabitEthernet1/0/46
 description LACP Link to Proxmox (PVE01-01)
 port link-type trunk
 port trunk permit vlan 1 30 to 40
 stp edged-port enable
 port link-aggregation group 7
#
interface GigabitEthernet1/0/47
 description LACP Link to Proxmox (PVE01-01)
 port link-type trunk
 port trunk permit vlan 1 30 to 40
 stp edged-port enable
 port link-aggregation group 7
#
interface GigabitEthernet1/0/48
 description Link to Proxmox iDrac (PVE01-01) 10.0.31.1
 port access vlan 31
 stp edged-port enable
With the networking configured I proceeded to configure the update repositories, update the servers and install my usual utilities:
1
2
3
4
5
6
rm /etc/apt/sources.list.d/pve-enterprise.list
echo "# PVE no-sub" >> /etc/apt/sources.list
echo "deb http://download.proxmox.com/debian/pve stretch pve-no-subscription" >> /etc/apt/sources.list
apt -y update
apt -y dist-upgrade
apt -y install htop tmux vim
Dell OMSA Installation
Being Dell servers I wanted the Dell OMSA features available to me.
The documentation for this isn’t fantastic but I achieved this as follows:
1
2
3
4
5
6
7
8
9
10
echo "deb http://linux.dell.com/repo/community/openmanage/910/stretch stretch main" > /etc/apt/sources.list.d/linux.dell.com.sources.list
apt -y install dirmngr
gpg --keyserver pool.sks-keyservers.net --recv-key 1285491434D8786F
gpg -a --export 1285491434D8786F | apt-key add -
apt -y update
apt -y install srvadmin-all
systemctl enable dataeng
systemctl start dataeng
systemctl enable dsm_om_connsvc
systemctl start dsm_om_connsvc
I was then able to connect to the OMSA on https://10.0.30.1:1311 (10.0.30.1 being the IP of my Proxmox host)
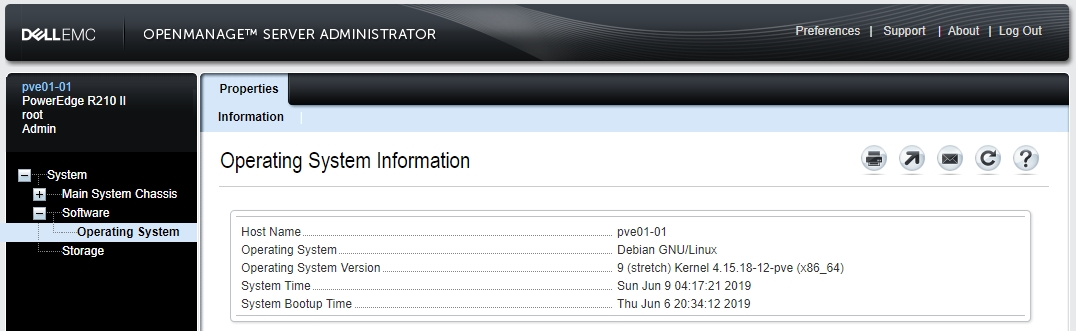
It’s certainly not a requirement, however I quite like being able to see the system information in a web browser.
Cluster Configuration
The newer versions of Proxmox make the configuration of a cluster very simple and everything can be done in the web UI.
Under “Datacenter -> Cluster” a new cluster can be defined with “Create Cluster”.
Once complete, the second node can be joined in the same location using the join information.
Simply click “Join Information” on the existing cluster node and copy the “join information” which is in base64 format. On the second node with no cluster defined, click “Join Cluster”, paste the join information in, type in the root password and click join.
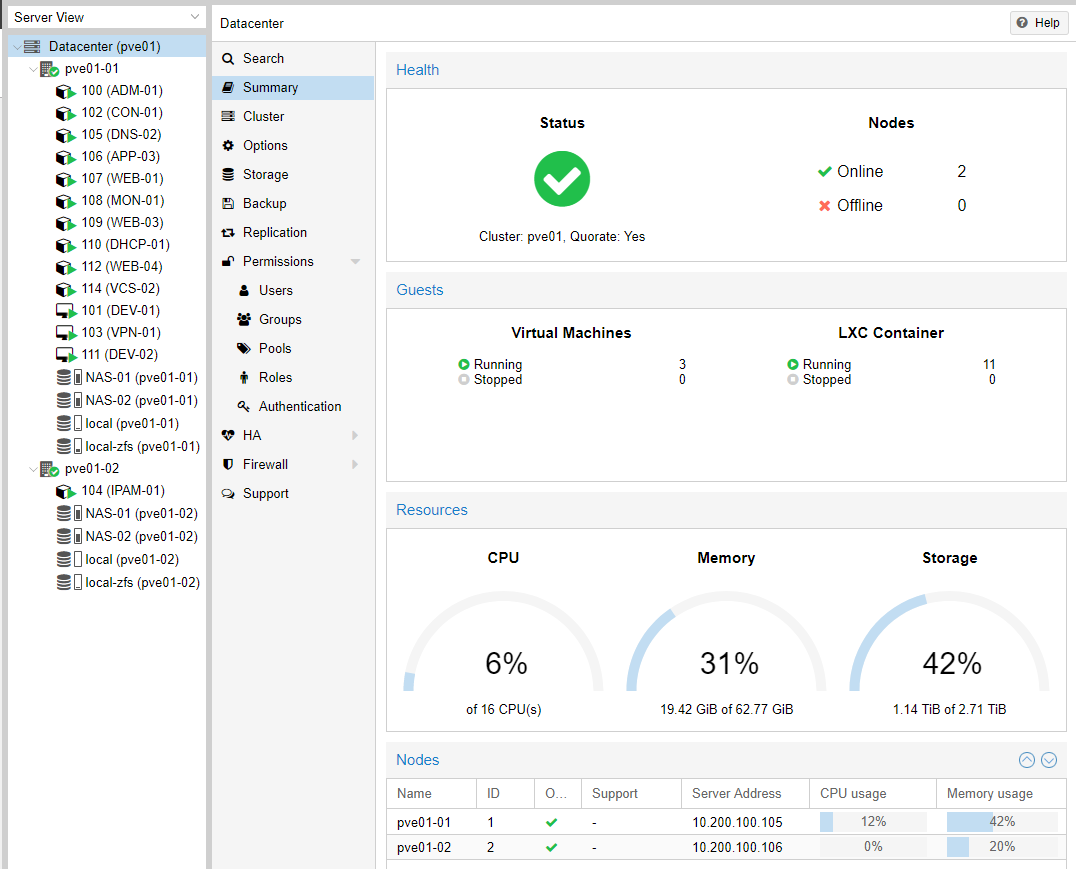
Everything else is taken care of and at this point I had a functioning two node cluster.
QDevice
One of the newer features in Proxmox is support for a Corosync QDevice. A long outstanding issue with running two node Proxmox clusters is that in the event of a vote, it is possible for there to be a tie.
Older versions of Proxmox got around this issue by using a quorum disk which required a lot of configuration and in my experience wasn’t overly reliable.
This can cause multiple issues and while it would be possible to add a third Proxmox server without any VMs or Containers, simply to prevent this situation it is rather overkill.
A QDevice is simply a lightweight process running on another separate server or virtual machine that adds a vote to one of the nodes so that in the event of a vote the is no tie.
I created a small virtual machine on my FreeNAS server for this with 1 CPU and 512MB of RAM.
I chose Ubuntu 18.04 as my operating system of choice and installed the required package sudo apt install corosync-qnetd && sudo systemctl enable corosync-qnetd.service.
Having previous experience with using qnetd with Proxmox I also copied the public root ssh keys from my proxmox hosts (/root/.ssh/id_rsa.pub) to `/root/.ssh/authorized_keys on the QDevice server. This allows the Proxmox servers to ssh into the QDevice server without needing to enable password based root ssh logins.
Each node in the Proxmox server then needed the QDevice package which can be installed as follows: apt -y install corosync-qdevice.
With each node prepared I added the QDevice as follows: pvecm qdevice setup 10.0.30.10 where the specified IP address is the IP of the QDevice server.
There is some output of this command which I failed to capture but it should be very obvious if anything went wrong.
I was then able to verify that my QDevice was in use and that my cluster had quorum as follows:
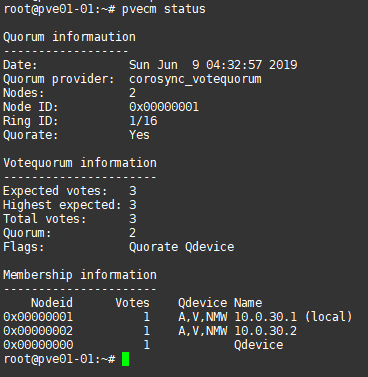
At this point I have a fully functional two node Proxmox cluster running the vast majority of my virtual machines and containers.
I finished things off by copying the distro script from my LibreNMS server, installing and configurating snmpd and adding the servers to my LibreNMS monitoring. However this post is already rather long and that would be getting quite out of scope to go into in detail.
I did mention that I am still running my HP Microservers and this is due to a couple of VM’s having quite different storage requirements. At some point later in the year I plan to add a third node to this new cluster which will be based on different hardware, specifically to fulfil these requirements. More on that in a later post.